前言
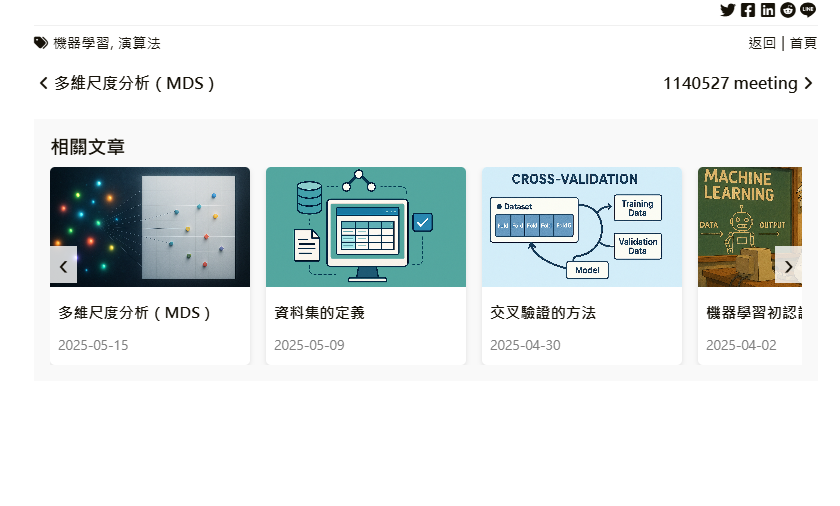
最近在翻閱文章時,發現閱讀完某文章後,要找到類似的文章是很麻煩的一件事。也由於在查找資料時,看到其他網站都有「類似文章」、「你可能也想看」等區塊,因此萌生在個人網站製作「相關文章」區塊的想法。
既然是相關文章,那總是需要知道那些文章會相似,對吧?但需要重新標記所有文章,或大費周章使用模型分類是一件很累(很蠢?)的事。在看到我的文章都有使用標籤或是分類進行標記時,就想到:「為什麼不就地取材呢?」因此,決定使用現有的標記作為分類依據。
以下介紹如何在每篇文章中增加「相關文章」區塊。
首先,於網站根目錄的 /layouts/partials/single/ 位置新增 related-carousel.html 檔案,並填入如下程式碼。
需要注意的是,在第 4 行需要填入一個圖片位置,當該文章沒有封面圖片時,會自動抓取一個預設的圖片。
而在先前的文章在 Hugo 中將文章上鎖中,我們為網站新增一個可以將文章上鎖的功能。在這裡,我不希望相關文章出現需要使用密碼才能閱讀的文章,因此第 15 行將這類文章過濾掉。
  1
  2
  3
  4
  5
  6
  7
  8
  9
 10
 11
 12
 13
 14
 15
 16
 17
 18
 19
 20
 21
 22
 23
 24
 25
 26
 27
 28
 29
 30
 31
 32
 33
 34
 35
 36
 37
 38
 39
 40
 41
 42
 43
 44
 45
 46
 47
 48
 49
 50
 51
 52
 53
 54
 55
 56
 57
 58
 59
 60
 61
 62
 63
 64
 65
 66
 67
 68
 69
 70
 71
 72
 73
 74
 75
 76
 77
 78
 79
 80
 81
 82
 83
 84
 85
 86
 87
 88
 89
 90
 91
 92
 93
 94
 95
 96
 97
 98
 99
100
101
102
103
104
105
106
107
108
109
110
111
112
113
114
115
116
117
| {{ $current := . }}
{{ $category := index .Params.categories 0 }}
{{ $tags := .Params.tags }}
{{ $defaultImg := "你的圖片 url" | absURL }}
{{/* 取得有相同 categories 或 tags 的文章 */}}
{{ $relatedByCategory := where .Site.RegularPages "Params.categories" "intersect" (slice $category) }}
{{ $relatedByTags := where .Site.RegularPages "Params.tags" "intersect" $tags }}
{{/* 合併兩者並去除重複,還要排除當前頁面 */}}
{{ $combined := union $relatedByCategory $relatedByTags }}
{{ $related := where $combined "Permalink" "ne" .Permalink }}
{{/* 依條件過濾:password 為空,且 draft / hidden 標記為 false 或無 */}}
{{ $filtered := where $related "Params.password" "in" (slice "" nil) }}
{{ $filtered = where $filtered "Draft" false }}
{{ $filtered = where $filtered "Params.draft" false }}
{{ $filtered = where $filtered "Params.hiddenFromHomePage" false }}
{{ $filtered = where $filtered "Params.hiddenFromSearch" false }}
{{/* 想要顯示的最新文章數 */}}
{{ $n := 10 }}
{{/* 依日期排序(由新到舊) */}}
{{ $sorted := sort $filtered "Date" "desc" }}
{{/* 取前 $n 篇 */}}
{{ $latest := first $n $sorted }}
{{ if gt (len $latest) 0 }}
<section class="related-carousel-container" id="related-posts">
<h3 class="related-carousel-title">
<a href="#related-posts" title="{{ T "relatedPosts" }}">{{ T "relatedPosts" }}</a>
</h3>
<div class="carousel-wrapper">
<button class="carousel-button prev">‹</button>
<div class="carousel" id="related-carousel">
{{ range $page := $latest }}
<a class="carousel-card" href="{{ $page.RelPermalink }}">
<img
src={{ $defaultImg }}
data-src="
{{- with $page.Params.featuredImage -}}
{{- $image := . -}}
{{- if or (strings.HasPrefix $image "http") (strings.HasPrefix $image "https") -}}
{{- $image | safeURL -}}
{{- else if (strings.HasPrefix $image "/") -}}
{{- $image | safeURL -}}
{{- else -}}
{{- $filename := path.Base $image -}}
{{- with $page.Resources.Match (printf "**/%s" $filename) -}}
{{- (index . 0).RelPermalink -}}
{{- else -}}
{{- $defaultImg -}}
{{- end -}}
{{- end -}}
{{ else }}
{{ $defaultImg }}
{{ end }}"
alt="{{ $page.Title }}"
class="lazyload"
>
<div class="card-title">{{ $page.Title }}</div>
<div class="card-date">{{ $page.Date.Format "2006-01-02" }}</div>
</a>
{{ end }}
</div>
<button class="carousel-button next">›</button>
</div>
</section>
{{ end }}
<script>
document.addEventListener('DOMContentLoaded', function () {
const carousel = document.getElementById('related-carousel');
const container = document.querySelector('.related-carousel-container');
if (!carousel || !container) return;
function updateJustify() {
const cards = carousel.querySelectorAll('.carousel-card');
let totalWidth = 0;
cards.forEach(card => {
const style = window.getComputedStyle(card);
const marginRight = parseFloat(style.marginRight) || 0;
totalWidth += card.offsetWidth + marginRight;
});
const containerWidth = container.clientWidth;
if (totalWidth <= containerWidth) {
carousel.classList.add('centered');
} else {
carousel.classList.remove('centered');
}
}
// 初始化與 resize 時都判斷
updateJustify();
window.addEventListener('resize', updateJustify);
// 左右按鈕控制
const prevBtn = document.querySelector('.carousel-button.prev');
const nextBtn = document.querySelector('.carousel-button.next');
if (prevBtn && nextBtn) {
prevBtn.addEventListener('click', () => {
carousel.scrollBy({ left: -220, behavior: 'smooth' });
});
nextBtn.addEventListener('click', () => {
carousel.scrollBy({ left: 220, behavior: 'smooth' });
});
}
});
</script>
|
新增 css 美化
新增程式碼篩選文章後,接下來要為這個功能增加一些美化。為了符合 Hugo LoveIt 主題的樣式,以下使用白色以及圓角作為裝飾,同時支援深色模式。
到網站根目錄的 /assets/css/_custom.scss 檔案新增如下程式碼。
  1
  2
  3
  4
  5
  6
  7
  8
  9
 10
 11
 12
 13
 14
 15
 16
 17
 18
 19
 20
 21
 22
 23
 24
 25
 26
 27
 28
 29
 30
 31
 32
 33
 34
 35
 36
 37
 38
 39
 40
 41
 42
 43
 44
 45
 46
 47
 48
 49
 50
 51
 52
 53
 54
 55
 56
 57
 58
 59
 60
 61
 62
 63
 64
 65
 66
 67
 68
 69
 70
 71
 72
 73
 74
 75
 76
 77
 78
 79
 80
 81
 82
 83
 84
 85
 86
 87
 88
 89
 90
 91
 92
 93
 94
 95
 96
 97
 98
 99
100
101
102
103
104
105
106
107
108
| // 相關文章輪播
.related-carousel-title {
margin-top: 0;
margin-bottom: 0.5rem;
padding: 0;
//font-size: 1.5rem;
font-weight: bold;
color: $global-font-color;
[theme=dark] & {
color: $global-font-color-dark;
}
}
.related-carousel-container {
margin-top: 3rem;
padding: 1rem;
background: #f9f9f9;
[theme=dark] & {
background: #242424;
}
}
.carousel-wrapper {
position: relative;
overflow: hidden;
}
.carousel {
display: flex;
overflow-x: auto;
scroll-snap-type: x mandatory;
-webkit-overflow-scrolling: touch;
scroll-behavior: smooth;
justify-content: flex-start;
gap: 1rem;
}
.carousel.centered {
justify-content: center;
}
.carousel::-webkit-scrollbar {
display: none;
}
.carousel-card {
flex: 0 0 auto;
width: 200px;
scroll-snap-align: start;
text-decoration: none;
color: inherit;
background: white;
border-radius: 5px;
overflow: hidden;
box-shadow: 0 2px 5px rgba(0,0,0,0.1);
[theme=dark] & {
background: #080808;
}
}
.carousel-card img {
width: 100%;
height: 120px;
object-fit: cover;
}
.card-title {
font-size: 0.95rem;
padding: 0.5rem;
font-weight: bold;
}
.card-date {
font-size: 0.8rem;
padding: 0 0.5rem 0.5rem;
color: gray;
}
.carousel-button {
display: block;
position: absolute;
top: 40%;
border: none;
font-size: 2rem;
padding: 0 0.5rem;
cursor: pointer;
z-index: 2;
color: $global-font-color;
background-color: rgba(255,255,255,0.8);
&:hover {
color: $global-link-hover-color;
}
[theme=dark] & {
color: $global-font-color-dark;
background: #000000;
&:hover {
color: $global-link-hover-color-dark;
}
}
}
.carousel-button.prev { left: 0; }
.carousel-button.next { right: 0; }
// 相關文章輪播
|
新增翻譯鍵
接下來,為了讓多語言網站能夠支援不同的文字選項,我們需要在語言檔案新增以下鍵值。
到網站根目錄的 /i18n/ 資料夾,找到欲修改的 語言代碼.toml ,新增如下鍵值。以下以 zh-tw.toml 示範。
zh-tw.toml
1
2
3
4
| # === custom at related carousel ===
[relatedPosts]
other = "相關文章"
# === custom at related carousel ===
|
在文章模板插入相關文章
最後,將模板路徑新增到文章鐘就大功告成了!到網站根目錄的 /layouts/posts/single.html 檔案,找到 {{- /* Footer */ -}} ,並在下方增加如下程式碼。
1
2
3
4
5
| {{- /* Footer */ -}}
{{- partial "single/footer.html" . -}}
{{- /* Related Carousel */ -}} <!-- 新增這個 -->
{{- partial "single/related-carousel.html" . -}} <!-- 新增這個 -->
|
這樣就完成相關文章區塊了。
結語
這一次成功新增相關文章的區塊,讓在閱讀文章的時候能夠更快找到下一篇想要閱讀的文章,不僅美觀更是兼顧了方便性!想嘗試這個功能可以看看下方的相關文章區塊👇!
運行環境
- Hugo 0.145.0
- LoveIt 主題(2025 年 2 月 21 日 Github 上的版本)


